WildFly Basic Auth with Elytron
December 13, 2020
This article shows how to configure Basic Authentication with WildFly Elytron. Elytron is the modern WildFly security framework that allows you to secure different profiles of the app server with the same configuration. This configuration is different that what you might have used in previous versions, now called "Legacy".
The JavaEE code described this article is on GitHub.
Basic Authentication is an old Internet standard for securing access to protected resources. Users provide credentials through a header in an HTTP. While the credentials aren't protected by Basic Authentication in transit, this deficiency in the protocol has been mitigated through the widespread adoption of TLS which encrypts all traffic. This is a link to the specification if you'd like more details.
If you'd like to see how to implement Basic Authentication, check out this article. While the Legacy scheme is a little simpler -- there's more configuration ready out-of-the-box -- I would use Elytron in any new projects.
The demo application has a pair of RESTful web services, PublicResource and ProtectedResource. PublicResource has open access. There are no constraints on it. ProtectedResource is subject to a constraint. This constraint requires that the request accessing ProtectedResource has a credential given the role "user".
The credentials will be stored in .properties files using a Properties Realm. The Realm is a pair of files containing hashed credentials (application-2-users.propertes) and roles (application-2-roles.properties).
This diagram is a roadmap for the configuration.
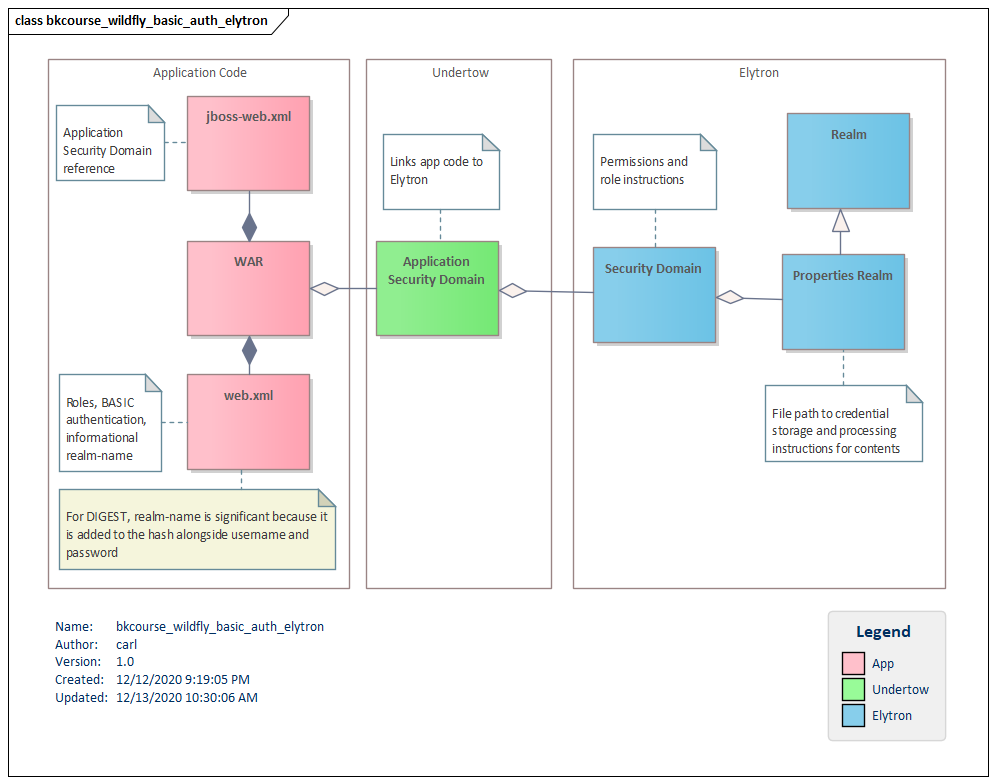
There are three parts to the configuration:
- Elytron,
- Undertow, and
- App code.
Elytron
The Elytron part of the configuration will involve creating a Realm and a Security Domain. The Realm in this article is a Properties Realm which is a pair of files containing hashed credentials and role assignments. The Security Domain references this Realm and sets a few defaults.
First, create a pair of .properties files in the /configuration folder. The roles file -- called application-2-roles.properties -- is a username, an equals sign, and a list of roles. In this case, there's just a single role "user". This role will be referenced in the web.xml file presented in App Code.
	# contents of application-2-roles.properties
	carlw2=user
Next, create the users properties file (application-2-users.properties). An entry in the file is a username, and equals sign, and a hash of username, realm, and password separated by commas. The documentation refers to a utility "add-user" for working with the out-of-the-box properties. I use openssl like this to form an entry.
$ echo -n 'cwalker:MyRealm:abc123' | openssl dgst -md5
This gives me (stdin)= 22cd267575fea1f370242fec7c7740b8.
With both files properly formed, create a Properties Realm in the Management Console next.
- Logon to the Console.
- Navigate to Configuration > Subsystems > Security > Security Realms > View.
- Select Security Realms > Properties Realms.
- Press the Add button.
- Specify Realm Name, Path, and Relative To.
- Press Add.
- Select the newly-added Realm.
- Select the Groups Properties tab and press Edit.
- Add the path info for the role .properties file. Save
- Select the User Properties tab and press Edit.
- Specify a Digest Realm Name using the same name. (In case you want DIGEST later)
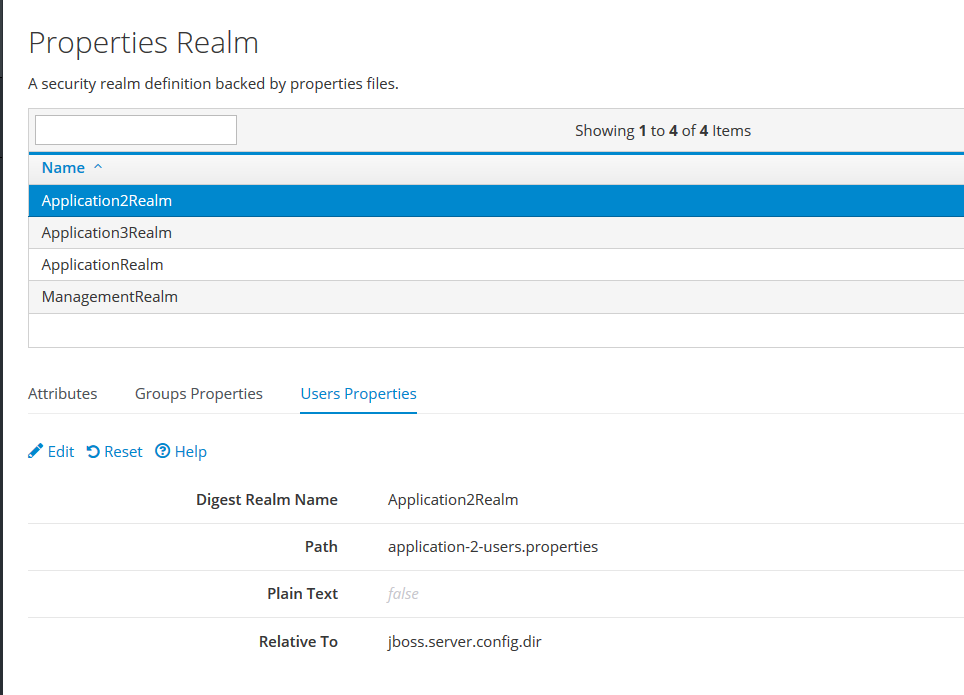
This is a screenshot of the Realm configuration used in the demo.
With the Realm in place, we'll create an Elytron Security Domain. The Security Domain object that we're working with in this article is an Elytron Security Domain. This is in the elytron section and not the (Legacy) security section. Another point of confusion is that you'll navigate into an SSL menu even though this demo does not use SSL.
- Navigate to Configuration > Subsystems > Security > Other Settings > View.
- Select SSL > Security Domain.
- Press Add
- Specify a Name and a Realm.
- Select the newly-added Realm and press Edit.
- Under Permission Mapper, select default-permission-mapper. Save.
- With the new Realm selected, press the Realms button.
- Select the Realm and press Edit.
- Under "Role Decoder", select groups-to-roles. Save.
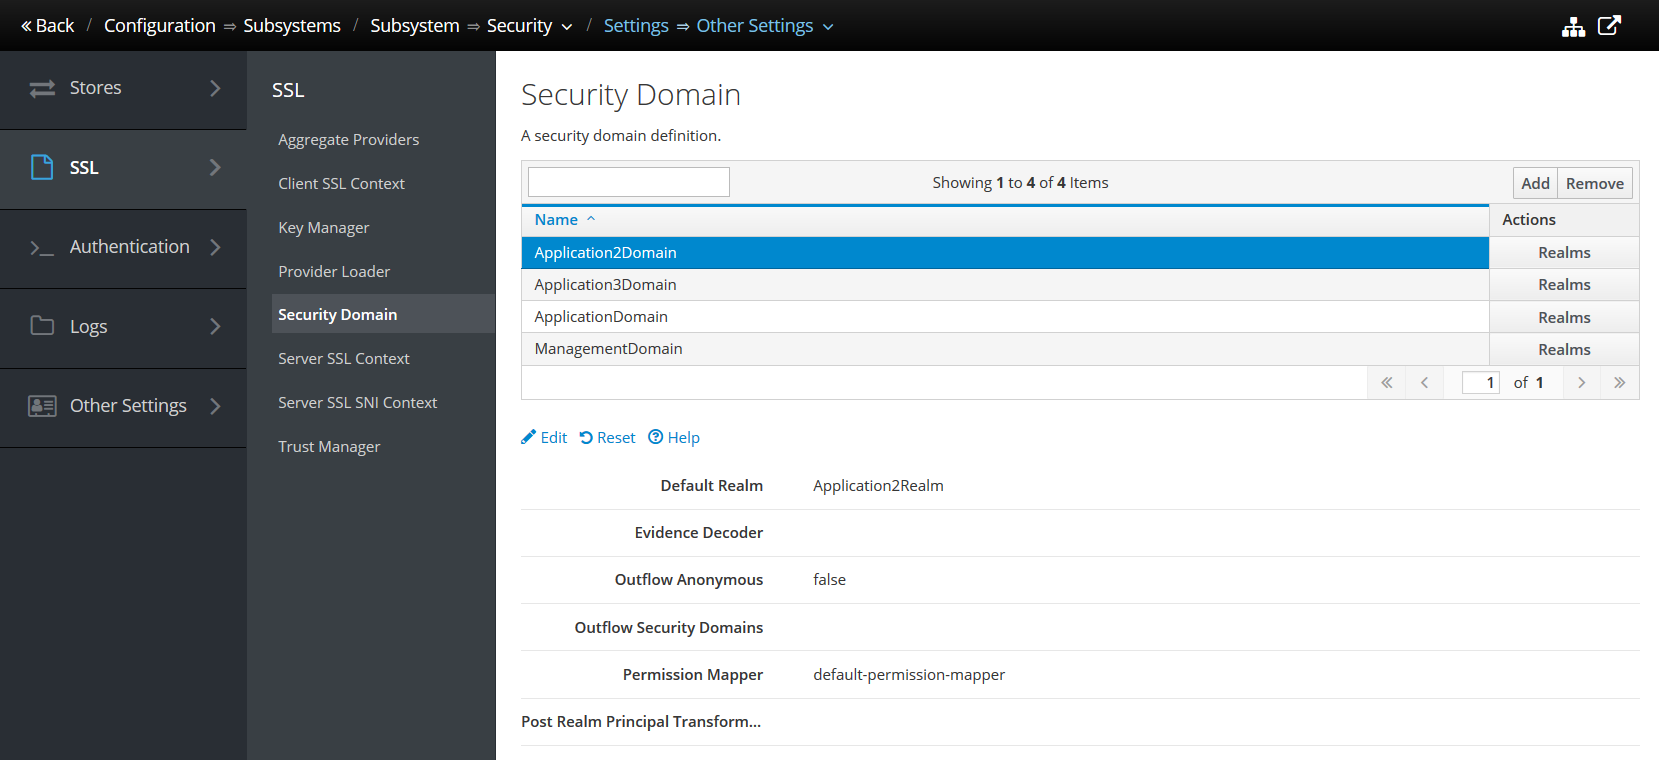
This is a screenshot of the Security Domain configuration used in the demo.
This concludes the Elytron configuration. The next step is to link the security structures to the HTTP handler Undertow.
Undertow
The Undertow configuration will link the security structures defined in the Elytron section with the App Code. To do this, add an Application Security Domain.
- Navigate to Configuration > Subsystems > Web / Undertow > Application Security Domain
- Press the Add button.
- Specify a Name and the Security Domain added in the Elytron section.
- Save.
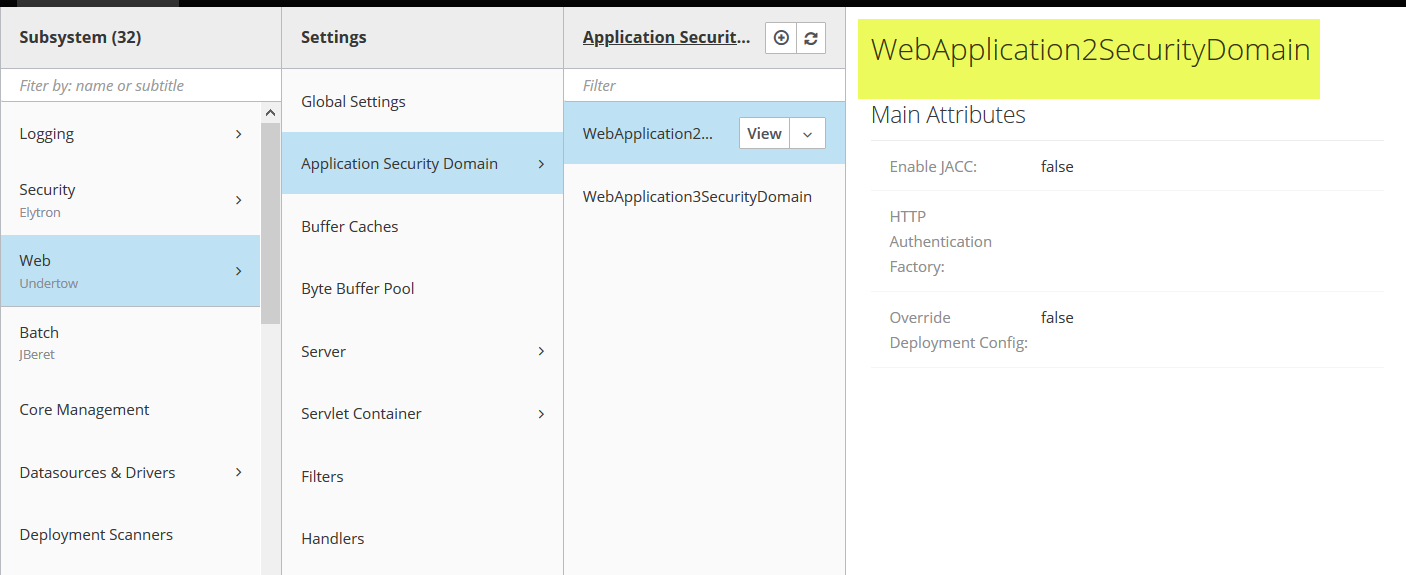
The Application Security Domain is the name that will be used in the jboss-web.xml file as described below.
App Code
In the web.xml file, use a security-constraint to define the protected URLs.
<security-constraint>
    <web-resource-collection>
        <web-resource-name>Protected page</web-resource-name>
        <url-pattern>/api/protected</url-pattern>
    </web-resource-collection>
    <auth-constraint>
        <role-name>user</role-name>
    </auth-constraint>
</security-constraint>
Next, define the role that is referenced in the auth-constraint.
<security-role>
    <role-name>user</role-name>
</security-role>
Specify BASIC in the auth-method. I also specify a realm-name. For BASIC, this is informational and can be echoed back in a browser's credentials dialog to tell the users where they're logging in to.
<login-config>
    <auth-method>BASIC</auth-method>
    <realm-name>Basic Auth 2 Web Site</realm-name>
</login-config>
Next, specify a security-domain in the WildFly-specific deployment descriptor, jboss-web.xml.
<security-domain>WebApplication2SecurityDomain</security-domain>
The value in the security-domain tag was defined in the Undertow section.
While there are more steps in configuration Elytron Basic Authentication versus what comes out-of-the-box, it's worthwhile learning this technique. As your deployments become more complex, you may start working with Domain Mode and you'll be able to leverage what you learned in this article across the app server.

By Carl Walker
President and Principal Consultant of Bekwam, Inc