Vue.js Navigation Helper
November 21, 2019
This article presents a Vue.js design for managing the business logic in a multi-page form. Business logic is factored out into a plain JS object called a NavigationHelper. This helper examines the current Vue Router route and the Vuex state of the form to decide the next page to present. The user is allowed to navigate backwards in the form to review and possibly change previous work. Vue.js techniques covered in the article include Slots, Mixins, Events, and Prototype.
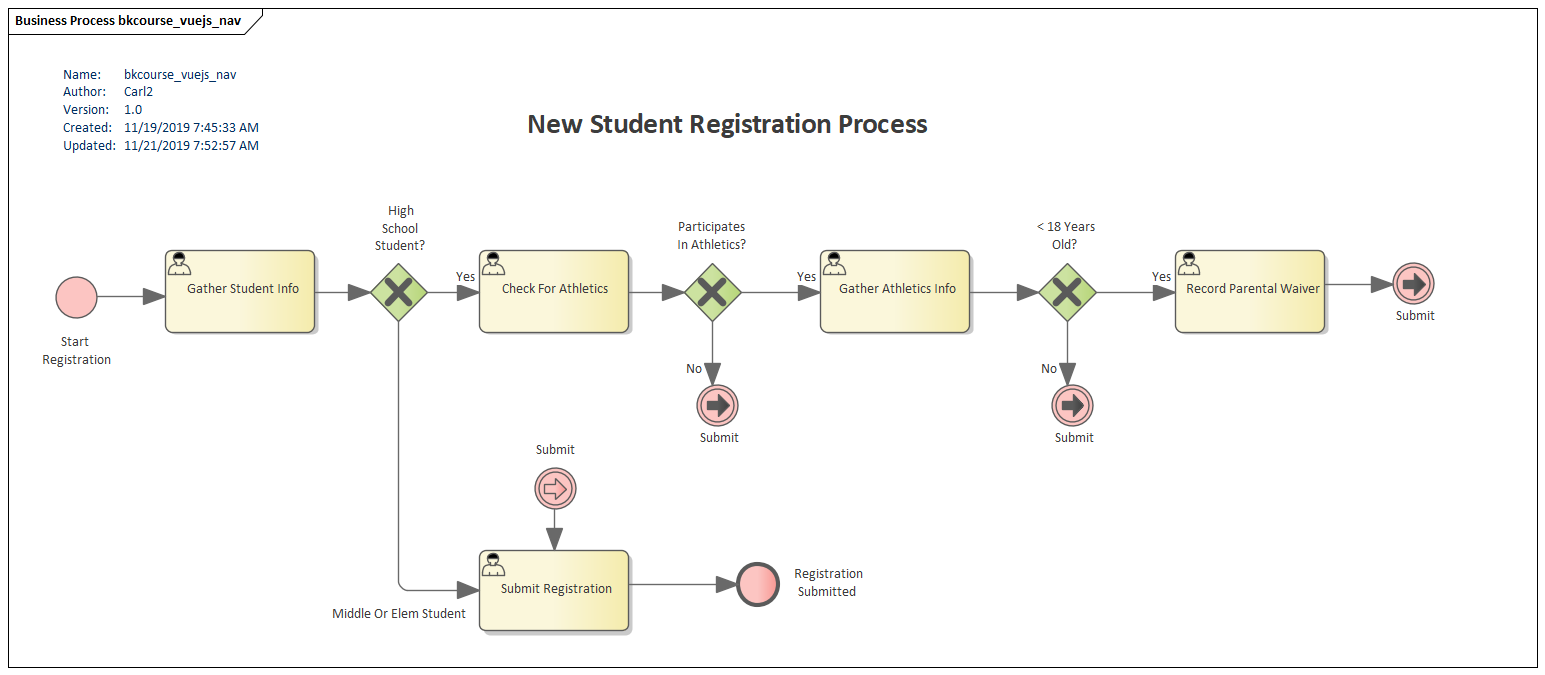
The following BPMN 2.0 diagram shows the registration process at a high level. Each yellow box is an activity that gathers information from the user. Each diamond marks with an X is a check to see if more information is needed to continue. If more information is not needed at any stage in the application, the user can proceed immediately to the final review and submit screens. The circles with an arrow are a technique I used to avoid excessive line connections; the flow jumps from closed arrow to open arrow.
This CodePen is the working example. Depending on what is selected in the various select controls, the user will be presented with a different set of screens. Consider the following use cases.
- Register Elementary School Student - Fill in the name fields and the grade (less than 8th). Confirm and submit.
- High School Student (No Athletics) - Fill in the name fields and grade. Select "No" for the athletics question. Confirm and submit.
- High School Student (Athletics, 18 or over) - Fill in the name fields and grade. Select "Yes" to athletics. Set the sport and the age to 18 or older. Confirm and submit.
- Minor High School Student (Athletics) - Fill in the name, grade, "yes" to athletics", sport, and age less than 18. Fill in the parental waiver. Confirm and submit.
See the Pen Vue.js Navigation Helper Example by Carl Walker (@walkerca) on CodePen.
The BPMN diagram is the specification for the Vue.js app. As such, there will be a strong affinity between the yellow activity boxes and the code. Specifically, I'll create a Vue component for each of the boxes. I'll use an additional "Thank You" component for the end Registration Submitted event.
Although independent components will work, this can quickly run into a tangle of logic. With each component responsible for display, gathering information for a save operation, and managing the decision of the next or previous component to show, the decision of "prev" or "next" based on what's been selected becomes buried. I prefer to draw this out to an object with a singular focus. The logic is easy to review at a glance and adding new pages into the flow doesn't affect multiple components.
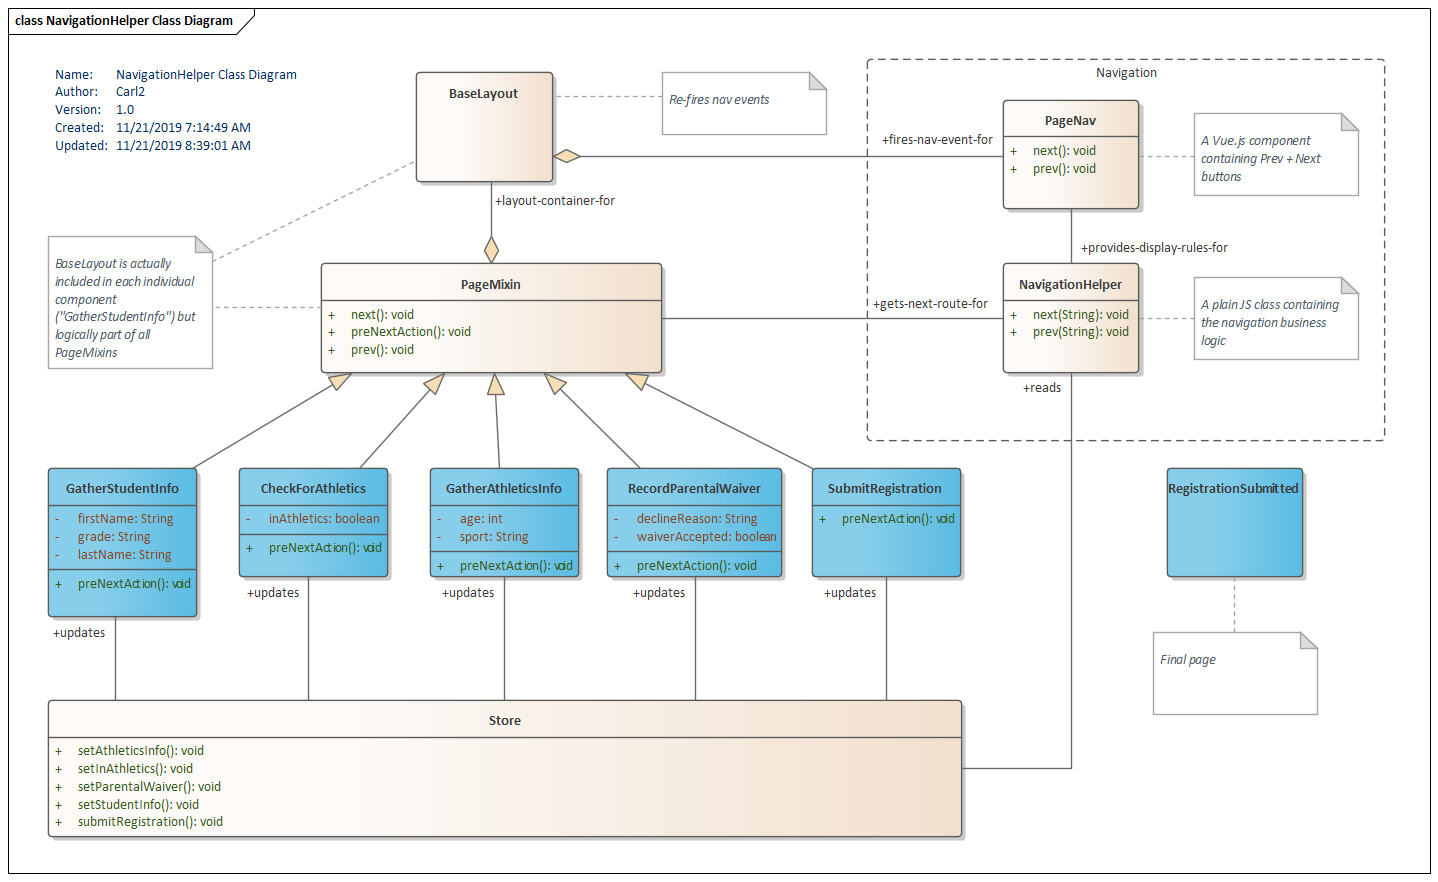
This UML diagram captures the Vue application presented in the CodePen. The blue boxes are VueJS components. Note the linkage between the components (blue) on the UML diagram and the yellow activity boxes on the BPMN requirements document. This naming and mapping helps with traceability which is the verification that something has been build that satisfies what's specified in the BPMN diagram.
Vuex
The application is tied together with Vuex. As the user moves back and forth through the sequence of forms, they are updating global program state. Eventually, this state will be persisted as a reviewed submission. Each component manages its own save operation since the individual components contain the UI controls needed for that segment of the application. The specifics of what a component is responsible for is listed in the Attributes section of the UML class representing the component. For instance, the component "GatherStudentInfo" manages attributes "firstName", "lastName", and "grade".
Each component's interacts with Vuex in two ways. Upon navigating to the next screen, an asynchronous method called preNextAction() is called. This will dispatch a component-specific action and save off the components data fields. When entering the screen from a "prev" navigation, a beforeRouteEnter() will check the Vuex store for data and set the data fields to the corresponding fields.
This listing is repeated from the CodePen. It shows the data(), beforeRouteEnter(), and preNextAction() methods. This is similar for the other components.
  data() {
    return {
      firstName: null,
      lastName: null,
      grade: null
    };
  },
  beforeRouteEnter(to,from,next) {
    next( vm => {
      vm.firstName = vm.$store.state.firstName;
      vm.lastName = vm.$store.state.lastName;
      vm.grade = vm.$store.state.grade;
    });
  },
  methods: {
    async preNextAction() {
      await this.$store.dispatch("setStudentInfo", {
        firstName: this.firstName,
        lastName: this.lastName,
        grade: this.grade
      });
    }
  }
Template And BaseLayout
Each of the components except the final "thank you" screen uses the BaseLayout component. BaseLayout conditionally provides a Prev or Next button to the component. It also manages the click event of the Prev and Next buttons.
This is a partial code listing of the CodePen's CheckForAthletics component. The BaseLayout component associates custom onPrev and onNext events with a pair of functions "prev" and "next", respectively. It also sets up a condition for disabling the Next button if the user has not made a required selection.
const CheckForAthletics = {
  template: `
  <base-layout @onPrev="prev" @onNext="next" :nextDisabled="inAthletics == null">
    <h2 class="subtitle">Does the student participate in athletics?</h2>
    <div class="field">
      <div class="control">
        <div class="select">
          <select v-model="inAthletics">
            <option :value="null">Select One</option>
            <option :value="false">No</option>
            <option :value="true">Yes</option>
          </select>
        </div>
        <p class="help is-danger" v-show="inAthletics == null">Required field</p>
      </div>
    </div>
  </base-layout>
  `,
The components presented so far -- GatherStudentInfo and CheckForAthletics -- do not themselves contain the next() or prev() functions. Those functions live in a Mixin called PageMixin. A Mixin is one way to share code among components in Vue.js. If you're familiar to Object Oriented Programming, the Mixin can be thought of as a superclass. PageMixin also contains a preNextAction() which I'm using as a base method. That way, even if my component doesn't have a preNextAction(), the next() function will still work. The empty function will be called instead of throwing an error indicating the the function is missing.
const PageMixin = {
  methods: {
    preNextAction() {},
    prev() {
      this.$router.push(this.$NavigationHelper.prev(this.$route.path));
    },
    async next() {
      await this.preNextAction();
      this.$router.push(this.$NavigationHelper.next(this.$route.path));
    }
  }
};
Notice that PageMixin references NavigationHelper. This is an object registered with Vue and available throughout the app as $NavigationHelper. That object will be presented later. At this point, it's important to note that neither the individual component nor the PageMixin is making any decisions about navigation. This is delegated completely to NavigationHelper.
In the listing for CheckForAthletics, BaseLayout throws two events "onPrev" and "onNext" back to the caller. BaseLayout is providing the container structure for all the components except the final component. (This final component doesn't contain any navigation since the registration has been submitted.)
const BaseLayout = {
  template: `
    <div id="wrapper">
      <section class="section">
        <h1 class="title">{{ $route.meta.pageTitle }}</h1>
        <slot></slot>
        <hr />
        <page-nav @onPrev="$emit('onPrev')" @onNext="$emit('onNext')" :nextDisabled="nextDisabled" />
      </section>
    </div>
`,
  props: {
    nextDisabled: {
      type: Boolean,
      default: false
    }
  },
  components: { PageNav }
};
To reduce the clutter in BaseLayout, a component PageNav is used to help manage the Prev and Next buttons. PageNav is the originator of the onPrev and onNext buttons that BaseLayout throws (BaseLayout is just a relay) since it actually holds the buttons and click events. See the CodePen for the complete listing of the component.
NavigationHelper
The remaining code to consider is NavigationHelper, the purpose of this article. This is a plain JS object that contains the important prev() and next() functions. Both of these functions receive the currentRoute and return the next route to take. The functions use the current Vuex store to decide on the route.
This is a partial listing of NavigationHelper's next() function. The complete listing is in the CodePen. I find this code highly readable as the next step is closely paired with the business rules under consideration. For instance, from the starting page "/", a high schooler (isHighSchool) will begin a series of athletic questions while an elementary or middle school goes straight to the registration confirmation page.
  next(currentRoute) {
    if( currentRoute == "/" ) {
      if( this.isHighSchool(this.store.state.grade) ) {
        return "/checkForAthletics";
      } else {
        return "/submitRegistration";
      }
    } else if( currentRoute == "/checkForAthletics" ) {
      if( this.store.state.inAthletics === true ) {
        return "/gatherAthleticsInfo";
      } else {
        return "/submitRegistration";
      }
    } else if( currentRoute == "/gatherAthleticsInfo" ) {
      if( this.store.state.age < 18 ) {
        return "/recordParentalWaiver";
      } else {
        return "/submitRegistration";
      }
As mentioned earlier, NavigationHelper is available throughout the app. I used prototype to hook this object up to Vue using the following code.
NavigationHelper.store = store;

Vue.prototype.$NavigationHelper = NavigationHelper;
Notice too that the NavigationHelper becomes an artifact unto itself. Adding, disconnecting, re-connecting, or changing page conditions can often be accomplished without touching individual components. If using Vue CLI and SFCs, this reduces the amount of files that get modified for a particular commit. Also, this is very easy to unit test.
This article presented a technique for managing a multi-page form with Vue, the Router, and Vuex. A special NavigationHelper object is used to manage business rules and what's presented to the user. While it's feasible to coordinate the action of a few components, this can break down as details of what one component needs leak into other components. The NavigationHelper brings decisions into a single artifacts that's easier to review and verify including with automated unit testing.

By Carl Walker
President and Principal Consultant of Bekwam, Inc