Vue.js Master / Details Persons Demo
March 13, 2019
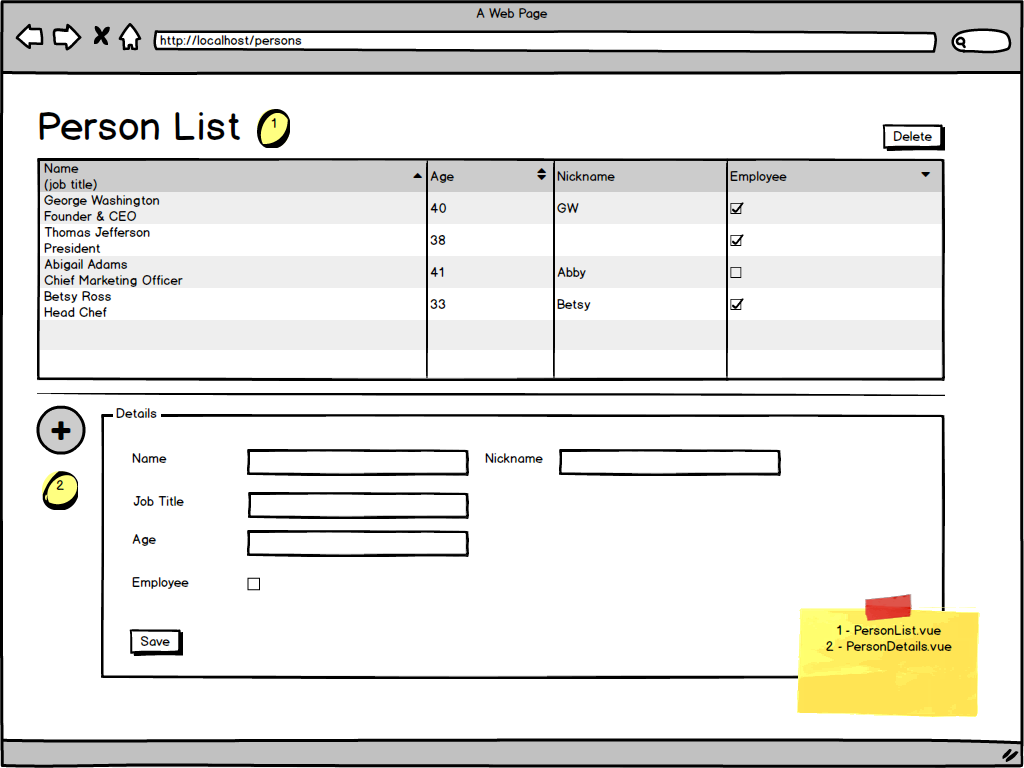
This article shows a Vue.js app that displays and manages a list of persons. The top part of the screen is a data grid. Selections fill out a lower detail form, making a record eligible for editing. There are controls for adding and deleting records.
This mockup shows the UI specification for the demo. The app is divided into two sections: PersonList.vue and PersonDetails.vue.
This video demonstrates the application. The following functions are tested.
- Add Person
- Select Person
- Update Person
- Delete Person
The Vue tools on the right side of the browser show the behind-the-scenes changes to the Vuex.store.
The video starts by pressing the New button. This adds a Persons record which shows up immediately in the Persons List. That record is edited and saved in an update action. A few more records are added, edited, and deleted.
You can try the app yourself here.
Project Setup
The project was created with the Vue CLI. I've selected "Manually" in CLI and have added the Vuex Store feature. Other features such as linters are optional.
> vue create vuejs-persons-demo
The demo uses Bootstrap. Once the project is created, change into its directory and run the following NPM command.
> npm install bootstrap jquery popper.js
With Vue CLI, App.vue and store.js are created for us along with a components folder and working skeleton app. The "HelloWorld" files will be replaced with the following program structure.
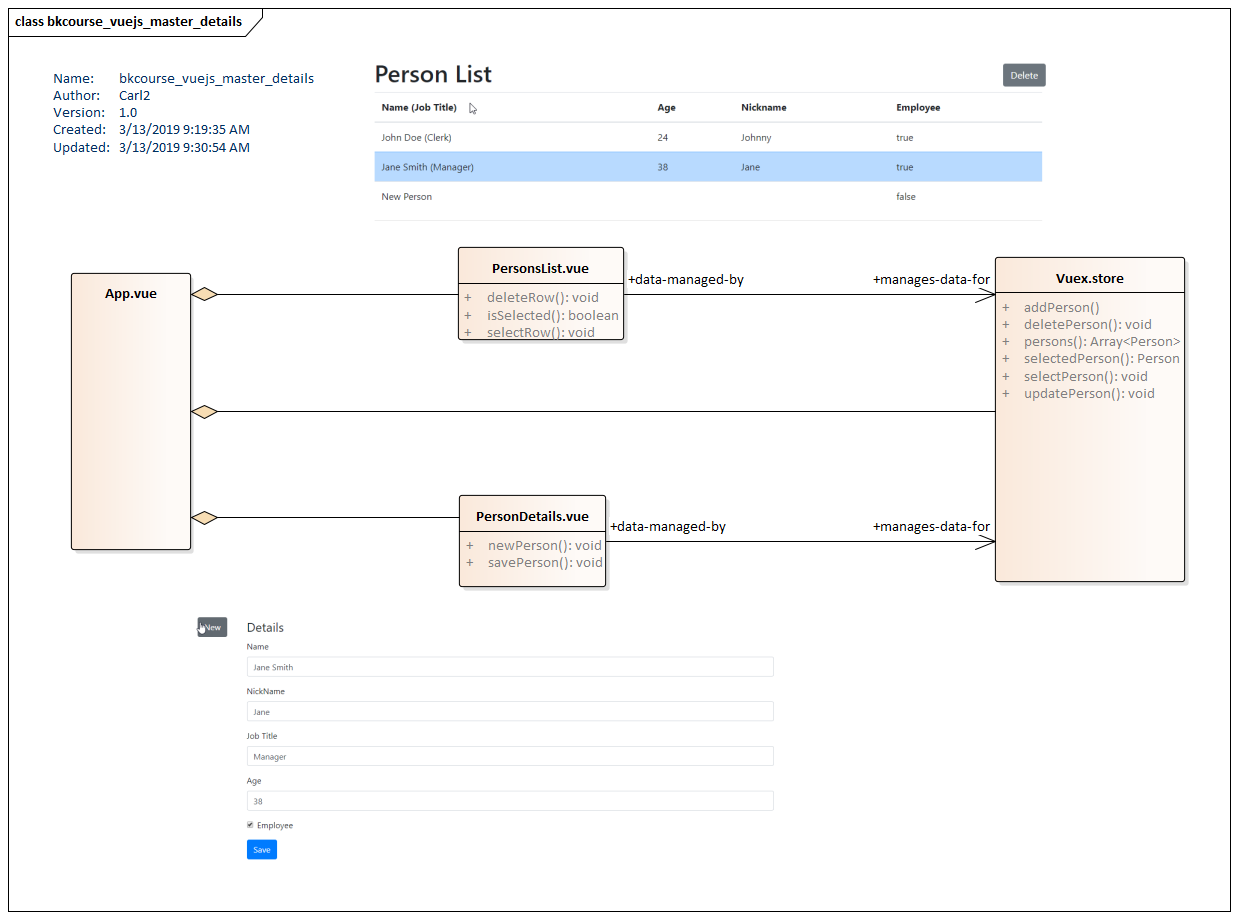
App.vue, the entry point for this Vue app, uses two components: PersonsList.vue and PersonDetails.vue. These components will be referenced in the top-level layout. As is typical, App.vue will reference the Vuex.store, making it eligible to be used in the components. Bootstrap is also initialized in App.vue
App.vue
<template>
  <div id="app" class="container mt-2">
    <person-list/>
    <hr>
    <person-details/>
  </div>
</template>

<script>
import PersonList from "./components/PersonList.vue";
import PersonDetails from "./components/PersonDetails.vue";

import "bootstrap/dist/css/bootstrap.css";

import store from "./store";

export default {
  name: "app",
  store,
  components: {
    "person-list": PersonList,
    "person-details": PersonDetails
  }
};
</script>
PersonList.vue
The component PersonList.vue is an HTML table outfitted with Bootstrap styles. Data is displayed in the table using a v-for on a Vue.store getter "persons". Two operations are executed from this top section. When the user selects a table row, an onClick calls a method selectRow which changes the Vuex.store state. This results in a change to the bound property getter "selectedPerson" which will enable the Delete button. Pressing the Delete button with a row selected will delete the row from the Vue.store and this will be reflected back in the table. selectRow also toggles the style, making the last selection "sticky". This is important because the top panel (the list) needs to coordinate with the lower form.
<template>
  <div>
    <div class="row align-items-center">
      <div class="col">
        <h1>Person List</h1>
      </div>
      <div class="col col-lg-1">
        <button
          class="btn btn-secondary"
          @click="deleteRow"
          :disabled="this.$store.getters.selectedPerson.id == -1"
        >Delete</button>
      </div>
    </div>
    <table class="table table-hover">
      <thead>
        <tr>
          <th scope="col">Name (Job Title)</th>
          <th scope="col">Age</th>
          <th scope="col">Nickname</th>
          <th scope="col">Employee</th>
        </tr>
      </thead>
      <tbody>
        <tr
          v-for="person in this.$store.getters.persons"
          :key="person.id"
          @click="selectRow(person)"
          :class="{'table-primary' : isSelected(person.id)}"
        >
          <td scope="row">
            {{ person.name }}
            <span v-if="person.jobTitle != ''">({{ person.jobTitle }})</span>
          </td>
          <td>{{ person.age }}</td>
          <td>{{ person.nickname }}</td>
          <td>{{ person.employee }}</td>
        </tr>
      </tbody>
    </table>
  </div>
</template>

<script>
export default {
  name: "PersonList",
  methods: {
    selectRow(p) {
      this.$store.dispatch("selectPerson", p);
    },
    isSelected(id) {
      return id == this.$store.getters.selectedPerson.id;
    },
    deleteRow() {
      this.$store.dispatch(
        "deletePerson",
        this.$store.getters.selectedPerson.id
      );
    }
  }
};
</script>
Making the selection in the top table (PersonList) could drive a direct manipulation of the lower form, but this leads to excessive coupling that is brittle. It's better to broker the selection change through Vuex.store since that change can be made available to any interested parties. Rather than stuffing more and more unrelated code in PersonList.vue, PersonList.vue can remain unchanged while the app grows around the selection.
PersonDetails.vue
PersonDetails.vue is initialized with an empty object which is from the selectedPerson getter in Vuex.store. When the New button is pressed, a template record (not quite the same as an empty record) is created. This makes a change to the Vuex.store which is broadcast to the PersonsList.vue component. As with the PersonList -> PersonDetails cause and effect, there is no direct call going from PersonDetails -> PersonList.
Since Vuex is involved, PersonDetails uses the :value attribute rather than the v-model attribute to fill the form. A submit handler will retrieve these values manually through the DOM and pass the record in its entirety to Vue.store. This requires me to use a hidden input field to communicate the id. The linkage between Vuex.store and the component uses mapState().
  <template>
  <div class="row">
    <div class="col col-lg-1">
      <button class="btn btn-secondary" @click="newPerson">New</button>
    </div>
    <div class="col">
      <form>
        <fieldset>
          <legend>Details</legend>

          <input type="hidden" id="id" :value="selectedPerson.id">

          <div class="form-group">
            <label for="name">Name</label>
            <input class="form-control" type="text" id="name" :value="selectedPerson.name">
          </div>

          <div class="form-group">
            <label for="nickname">NickName</label>
            <input class="form-control" type="text" id="nickname" :value="selectedPerson.nickname">
          </div>

          <div class="form-group">
            <label for="jobTitle">Job Title</label>
            <input class="form-control" type="text" id="jobTitle" :value="selectedPerson.jobTitle">
          </div>
          <div class="form-group">
            <label for="Age">Age</label>
            <input class="form-control" type="text" id="age" :value="selectedPerson.age">
          </div>
          <div class="form-group form-check">
            <input
              class="form-check-input"
              type="checkbox"
              id="employee"
              :checked="selectedPerson.employee"
            >
            <label class="form-check-label" for="Employee">Employee</label>
          </div>

          <button type="submit" class="btn btn-primary" @click.prevent="savePerson">Save</button>
        </fieldset>
      </form>
    </div>
  </div>
</template>

<script>
import { mapState } from "vuex";

export default {
  name: "PersonDetails",
  methods: {
    newPerson() {
      const p = {
        name: "New Person",
        jobTitle: "",
        age: "",
        nickname: "",
        employee: false
      };
      this.$store.dispatch("addPerson", p);
    },
    savePerson(event) {
      const p = {
        id: event.target.form["id"].value,
        name: event.target.form["name"].value,
        nickname: event.target.form["nickname"].value,
        jobTitle: event.target.form["jobTitle"].value,
        age: event.target.form["age"].value,
        employee: event.target.form["employee"].checked
      };
      this.$store.dispatch("updatePerson", p);
    }
  },
  computed: {
    ...mapState({
      selectedPerson: state => state.selectedPerson
    })
  }
};
</script>
Vuex
This Vuex.store code replaces the stock contents of store.js. The operations manipulate three pieces of state data.
- persons - An array of persons created through PersonDetails and displayed in PersonList
- selectedPerson - A single Person record selected in PersonList and displayed in PersonDetails; can be empty to avoid null errors
- nextId - An id generator; would be replaced by back-end calls
import Vue from "vue";
import Vuex from "vuex";

Vue.use(Vuex);

function createEmptyPerson() {
  return {
    id: -1,
    name: "",
    jobTitle: "",
    age: "",
    nickname: "",
    employee: false
  };
}

export default new Vuex.Store({
  strict: true,
  state: {
    persons: [],
    selectedPerson: createEmptyPerson(),
    nextId: 1
  },
  mutations: {
    ADD_PERSON(state, person) {
      person.id = state.nextId++;
      state.persons.push(person);
      state.selectedPerson = person;
    },
    SELECT_PERSON(state, person) {
      state.selectedPerson = person;
    },
    DELETE_PERSON(state, id) {
      if (state.selectedPerson.id == id) {
        state.selectedPerson = createEmptyPerson();
      }
      state.persons = state.persons.filter(p => p.id != id);
    },
    UPDATE_PERSON(state, person) {
      var store_p = state.persons.find(p => p.id == person.id);
      if (store_p != null) {
        store_p.name = person.name;
        store_p.nickname = person.nickname;
        store_p.jobTitle = person.jobTitle;
        store_p.age = person.age;
        store_p.employee = person.employee;
      }
    }
  },
  actions: {
    addPerson(context, person) {
      context.commit("ADD_PERSON", person);
    },
    selectPerson(context, person) {
      context.commit("SELECT_PERSON", person);
    },
    deletePerson(context, id) {
      context.commit("DELETE_PERSON", id);

    },
    updatePerson(context, person) {
      context.commit("UPDATE_PERSON", person);
    }
  },
  getters: {
    persons(state) {
      return state.persons;
    },
    selectedPerson(state) {
      return state.selectedPerson;
    }
  }
});
This simple demo could easily be implemented in a single Vue template without Vuex. However, in breaking out the app into distinct components, the app is ready to take on additional requirements without having to worry about breaking existing functionality. Vuex provides the back-channel communications needed to keep these components separated. With this design, new components for navigation, badges, or alerts can be added and the existing PersonList.vue and PersonDetails.vue would remain unchanged.

By Carl Walker
President and Principal Consultant of Bekwam, Inc