Moving Shapes in TornadoFX
January 5, 2018
This article shows how to move objects on in a shape-driven JavaFX UI. This implements a requirement found in drawing apps like CorelDRAW or Adobe Illustrator. It can also be used to enhance a business application by allowing users to organize rules or data by screen position in a way that makes the most sense to themselves.
The following video shows the user moving three rectangles. The first and second rectangles (blue and yellow) are moved in all directions using various selection points within the shape. The third rectangle (green) demonstrates an failed attempt to move the rectangle by selecting outside of its transformed space. Then, the third rectangle is moved in all directions.
Structure
The program starts with a primary View called MovingView.
class MovingView : View("Moving App") {

    val rectangles = mutableListOf<Rectangle>()

    var selectedRectangle : Rectangle? = null
    var selectedOffset : Point2D? = null

    val positionMessage = SimpleStringProperty("")

    enum class XFormType { NONE, SCALE, ROTATE }
rectangles is a convenient data structure for working with the Rectangle shapes without traversing the Scene Graph. selectedRectangle and selectedOffset are two variables used for tracking the move operation throughout different event filters. positionMessage is a bound object used in a Label. The enum is referenced later in a factory method.
This is the Scene Graph of the View. A reusable factory method is encapsulated in the pane{} builder.
    override val root = vbox {

        anchorpane {
            pane {

                fun createRectangle(startX : Double, f : Color, xform : XFormType = XFormType.NONE) : Rectangle {
                    return rectangle(startX, 100.0, 50.0, 50.0 ) {
                        fill = f
                        stroke = Color.BLACK
                        rectangles.add( this )  // for convenience
                        layoutX = 25.0
                        layoutY = 25.0
                        when(xform) {
                            XFormType.SCALE -> {
                                scaleX = 2.0
                                scaleY = 2.0
                            }
                            XFormType.ROTATE -> {
                                rotate = 45.0
                            }
                        }
                    }
                }

                createRectangle( 100.0, Color.BLUE )
                createRectangle( 300.0, Color.YELLOW, XFormType.SCALE )
                createRectangle( 500.0, Color.GREEN, XFormType.ROTATE )

                anchorpaneConstraints {
                    topAnchor = 0.0
                    bottomAnchor = 0.0
                    rightAnchor = 0.0
                    leftAnchor = 0.0
                }

                addEventFilter(MouseEvent.MOUSE_PRESSED, ::startDrag)
                addEventFilter(MouseEvent.MOUSE_DRAGGED, ::drag)
                addEventFilter(MouseEvent.MOUSE_RELEASED, ::endDrag)
            }

            vboxConstraints {
                vgrow = Priority.ALWAYS
            }
        }

        label(positionMessage ) {
            padding = Insets(2.0)
        }

        padding = Insets(2.0)
    }
The Scene Graph contains a Pane with three Rectangles. The Pane is used to support absolute positioning. Three event filters are registered on MOUSE_PRESSED, MOUSE_DRAG, and MOUSE_RELEASE events. These filters are put on the Pane container which can work with its child Rectangle objects for contains() and relocate().
Operation
The startDrag() function is activated when the user generates a MOUSE_PRESSED event on the Pane. This method first determines whether or not the selection was made in one of the Rectangle shapes. If so, the state variables selectedRectangle and selectedOffset are set.
    private fun startDrag(evt : MouseEvent) {

        rectangles
                .filter {
                    val mousePt = it.sceneToLocal( evt.sceneX, evt.sceneY )
                    it.contains(mousePt)
                }
                .firstOrNull()
                .apply {
                    if( this != null ) {

                        selectedRectangle = this

                        val mp = this.parent.sceneToLocal( evt.sceneX, evt.sceneY )
                        val vizBounds = this.boundsInParent

                        selectedOffset = Point2D(
                                mp.x - vizBounds.minX - (vizBounds.width - this.boundsInLocal.width)/2,
                                mp.y - vizBounds.minY - (vizBounds.height - this.boundsInLocal.height)/2
                        )
                    }
                }
    }
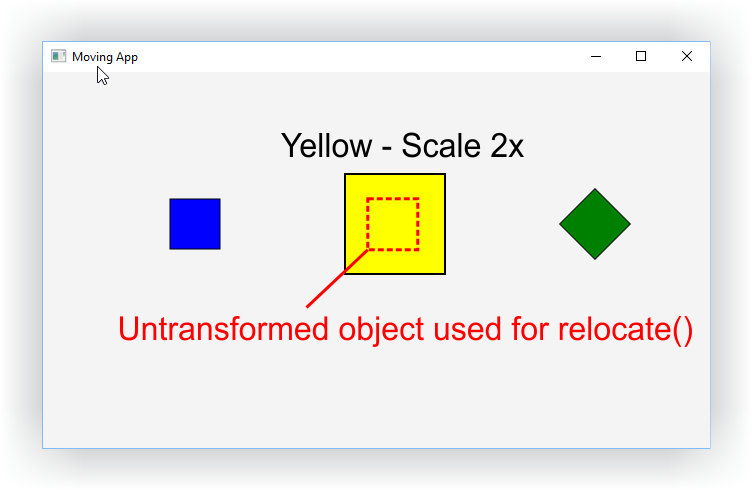
The selectedOffset calculation is used to record the position of the mouse within the shape. This is needed to avoid a jump in later relocate() call made when the mouse is dragged. Without the offset, a drag anywhere besides the center of the shape would cause the shape to move its center under the cursor. To compute this value, I subtract the top left (minX/minY) corner from the mouse position. The width/height subtractions -- which can be 0 -- are used for scale transformations. The later relocate() works only with the untransformed shape even if the initial selection is made within the expanded bounds.
This image shows the three Rectangles. The scaled middle yellow Rectangle has a dashed red line indicating the untransformed object which is the same size as the blue and green Rectangles.
The drag() function is called as the user moves the mouse around the screen with the left button pressed. The selectedRectangle and selectedOffset were captured in the MOUSE_PRESSED event. The drag() function uses the relocate() function of Node to move the Rectangle around, providing the user with a visual cue of the operation. A Label is also updated.
    private fun drag(evt : MouseEvent) {

        val mousePt : Point2D = (evt.source as Pane).sceneToLocal( evt.sceneX, evt.sceneY )
        if( selectedRectangle != null && selectedOffset!= null  ) {

            selectedRectangle!!.relocate(
                    mousePt.x - selectedOffset!!.x,
                    mousePt.y - selectedOffset!!.y)

            positionMessage.value =
                "Last Selection: Mouse (${mousePt.x}, ${mousePt.y}) " +
				"Moving To (${mousePt.x - selectedOffset!!.x}, ${mousePt.y - selectedOffset!!.y})"

        }
    }
The stopDrag() function closes out the operation by resetting the state variables.
	private fun endDrag(evt : MouseEvent) {
		selectedRectangle = null
		selectedOffset = null
	}
The App subclass and styles can be found in the source .zip referenced below.
Wrap Up
This article shows how to move an shape around in a Pane. The code presented works with both transformed and untransformed shapes.
Resources
The source code presented in this article series is a Gradle project found in the zip file below. The SelectingApp source is paired with another example, DraggingApp.
To run the demo, create an Application configuration in your IDE that will run the MovingApp class. In IntellIJ,
- Go to Run > Edit Configurations
- Select Application and press +
- Name the configuration
- Select the MovingApp.kt file.

By Carl Walker
President and Principal Consultant of Bekwam, Inc