Beginning JavaFX TableView in Kotlin
September 16, 2016
This article describes how to view data in a JavaFX TableView using Kotlin. A UI is built in Scene Builder and a JavaFX Controller is implemented as a Kotlin class. The program begins execution from a Kotlin JavaFX Application subclass which includes the entry point, a static main().
Inside the Controller, there is a refresh function. This function loads data into a List of domain objects called Participants. A Participant is a person with a single attribute “screenName”. The Participant is a Kotlin data class, a special class that streamlines this type of container object.
The List of domain objects is retrieved in a JavaFX Task. When the Task completes, the contents of the TableView are removed and replaced with the retrieval. For this article, the data source is a hardcoded List and the data is slightly modified by appending a counter to show the effect or repeated refresh calls.
This is a video demonstration of the program. The program starts and immediately invokes the refresh operation, providing data to the TableView. Pressing the Refresh Button will retrieve more data as proven by the changing Participant screenNames.
Project
This article uses the IntelliJ IDEA integrated development environment. There are Kotlin plugins for other IDEs. To start, create a Kotlin Project. In IntelliJ IDEA, this is New > Project < Kotlin.
Scene Builder
Scene Builder is used to construct the UI. First select the controls.
- Create a new .fxml file in Scene Builder.
- Drag a VBox onto the canvas.
- Drag a Button onto the VBox.
- Drag a TableView onto the VBox.
Next, apply the layout to the main container of the app, the VBox.
- With the VBox selected, set the Padding to 40 on all sides and the Spacing to 10.
- Set the Pref Width and the Pref Height to USE_COMPUTED_SIZE.
- Set the Alignment to TOP_RIGHT. This pushes the Refresh Button to the TOP_RIGHT.
Adjust the layout and configuration of the TableView.
- With the TableView selected, set Vgrow to ALWAYS. This will enable the TableView to take up all the available space if the window is resized.
- Set the Pref Width and the Pref Height to USE_COMPUTED_SIZE.
- Set the Constrain Resize Policy to constrain-resize. This will allow the columns to take up the full width of the TableView.
- Remove the TableColumn C2.
- With TableColumn C1 selected, change the Text to “Screen Name”.
At this point, you can press Control+P to test your work within Scene Builder. Resize the window and verify that the TableView takes up any remaining space and that the Refresh Button retains its fixed position in the top right.
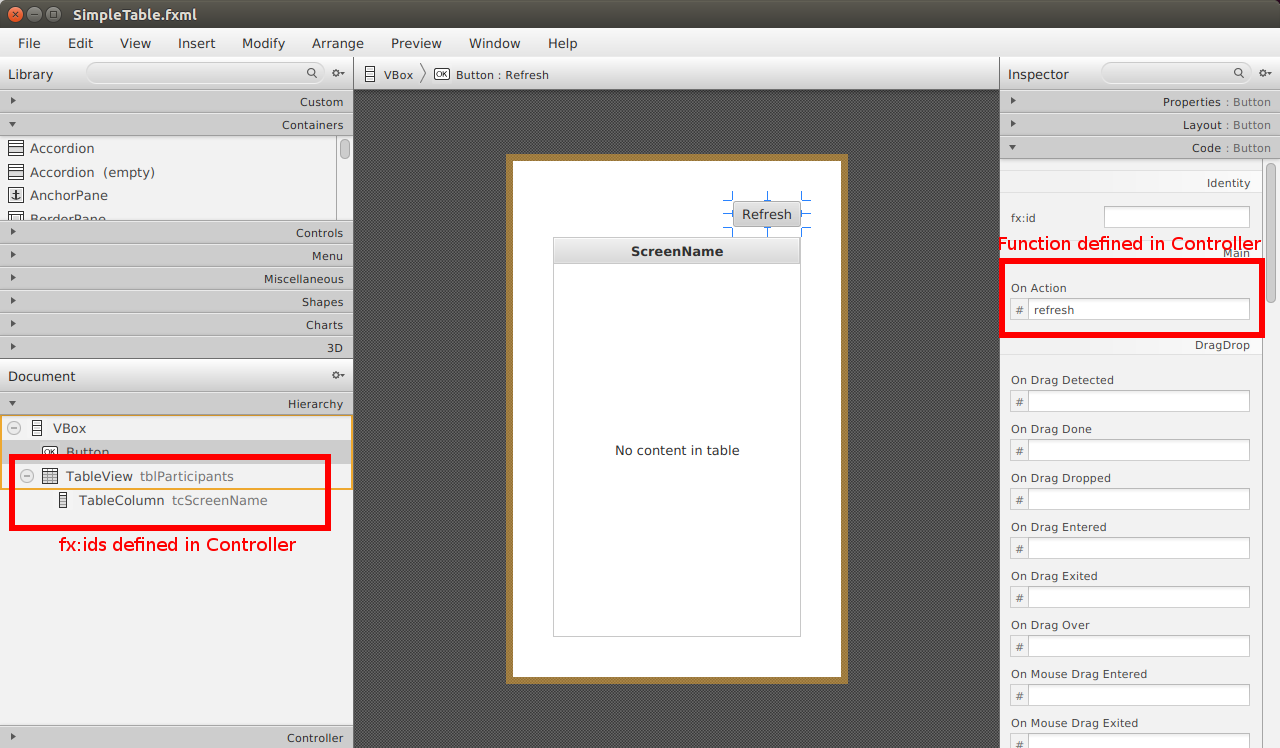
For the final step involving Scene Builder, assign the Controller, fx:ids, and function.
- In the Controller panel, set the Controller Class to SimpleTableController. This is the name of a Kotlin class that has not been created yet.
- Select the TableView and, in the Code panel, set the fx:id to tblParticipants.
- Select the TableColumn. Set the fx:id to tcScreenName.
- Select the Refresh Button. Set the On Action to refresh.
See this screenshot for the finished product. Note the annotations marking the settings from the final step.
Main and Application Subclass
This article places all of the Kotlin code in a single file in the default package.
Create a Kotlin file SimpleTableApp.kt alongside the .fxml file from the previous section. Add the following class to the file, adding the required imports. In the Grade distribution below, the FXML is located in a separate /resources folder which is a best practice. In that case, notice that the FXMLLoader argument begins with a / as in /SimpleTable.fxml. Relative paths will not work in that scenario.
class SimpleTableApp : Application() {

    override fun start(primaryStage: Stage?) {

        val fxmlLoader = FXMLLoader( SimpleTableApp::class.java.getResource("SimpleTable.fxml"))

        val parent : Parent = fxmlLoader.load()

        val c : SimpleTableController = fxmlLoader.getController()

        val scene = Scene( parent )

        primaryStage!!.scene = scene
        primaryStage.title = "SimpleTableApp"
        primaryStage.width = 667.0
        primaryStage.height = 375.0
        primaryStage.onShown = EventHandler { c.refresh() }
        primaryStage.show()
    }

    companion object {
        @JvmStatic
        fun main(args: Array<String>) {
            launch(SimpleTableApp::class.java)
        }
    }
}
As with Java, Kotlin needs a main entry point to begin execution. This is done in the main() function defined within the class as a companion object. The @JvmStatic annotation is needed to mark the function as static.
Despite the main() definitions location within the SimpleTableApp class, I have to specify the class in the launch() arguments. That's because the companion object itself belongs to a class that is not SimpleTableApp, nor is it a class that extends Application.
Since SimpleTableApp is a subclass of Application, the start() function needs to be overridden. JavaFX provides a primaryStage which is nullable as indicated by the question mark. Using several variable declarations, an FXMLLoader object is created and the root Parent and Controller are retrieved. The root Parent is used to create a Scene.
The Controller – the class SimpleTableAppController still has to be defined – is used in the onShown function of the Stage. Once the Stage is shown, the refresh() function of the Controller will be called which will retrieve data and present a filled-in window. EventHandler is a functional interface that supports this direct assignment.
Regarding nullability, the primaryStage comes in as nullable, although it is impossible in this case. So, the !! operator is used to tell Kotlin that it is ok to use this object as-is. The !! operator will throw a NPE if that ends up not being the case. Subsequent references to primaryStage do not need to repeat the !! operator although it is not a syntax error if it is repeated.
Data Class
Participant is a domain object containing a single field “screenName”. Kotlin Data Classes are a concise way to create this type of component. In the case of this program, the Data Class is a one-line definition that is also started in the SimpleTableApp.kt file. It should not be included within the SimpleTableApp class.
data class Participant(val screenName: String)
Controller
A JavaFX Controller links the objects created from the .fxml file with the data. Add the following class – broken apart for presentation – to the Kotlin file outside of any other class. Start with the class definition and the pair of JavaFX controls that were tagged with fx:ids in Scene Builder.
class SimpleTableController {

    @FXML var tcScreenName = TableColumn<Participant, String>()


    @FXML var tblParticipants = TableView<Participant>()
These fields must be defined as var. It it valid syntax to use val, but this will create objects that cannot be reassigned to .fxml content later. The result would be a pair of fields disassociated from what you see on the screen.
Next, add an initialize method. While the @FXML annotation was required for the fields, the annotation is not required for functions. This is an instruction telling the TableColumn which field it will be displaying from the domain object Participant.
    fun initialize() {

      tcScreenName.cellValueFactory = PropertyValueFactory<Participant, String>("screenName")

    }
Add the implementation of the refresh() function. Pressing the Refresh Button triggers the linkage set up between Scene Builder's definition and the Controller function. Recall that refresh() is also called from the primaryStage to initially fill in the data.
    fun refresh() {
        val task = object : Task<List<Participant>> () {
        override fun call(): List<Participant> {
          return fetchData()
       }

    override fun succeeded() {
        tblParticipants.items.clear()
        tblParticipants.items.addAll( value )
    }
  }

  Thread(task).start()
}
Although concurrency is generally regarded as an advanced topic, it is essential to use it even at beginning levels. The refresh() function could call fetchData() directly and replace the values in tblParticipants, but type of shortcut could blow up a deployment when larger data sets or network latency become apparent.
Finally, this is the fetchData() method that provides continuously-modified, harcoded values to the program. fetchData() represents a call to the back-end, say a RESTful web services call or a database call.
  var counter = 1

  fun fetchData() : List<Participant> {

  val participants = listOf(
       Participant("Carl" + counter++),
       Participant("Wanda" + counter++),
       Participant("Peter" + counter++)
       )
    return participants
  }
}
This article showed how to create a simple TableView JavaFX app using the Kotlin programming language. Scene Builder was used to construct and partially test the UI. A JavaFX Controller provided the data using a Task to keep the application responsive. For more information about JavaFX and Kotlin, be sure to follow the TornadoFX project which is a framework designed to make your JavaFX / Kotlin programming even easier.
Resources
The source code presented in this video series is an IntelliJ IDEA project found in the zip file below.
SimpleTableAppKotlin Source Zip (25Kb)
By Carl Walker
President and Principal Consultant of Bekwam, Inc