Beginning JavaFX TableView
September 16, 2016
This article describes how to view data in a JavaFX TableView. A UI is built in Scene Builder and a JavaFX Controller is implemented with a refresh function. The program begins by showing a Stage with a single Launch Button, built in code rather than Scene Builder. Pressing the Launch Button brings up a second Stage containing a TableView and a Button. On display of the second Stage, the TableView is filled with a list of domain objects. The Refresh Button can be pressed and the TableView is loaded with new data.
The List of domain objects, called Participants, is retrieved in a JavaFX Task. When the Task completes, the contents of the TableView are removed and replaced with the retrieval. For this article, the data source is a hardcoded list. The data is slightly modified with each refresh by appending a counter.
This is a video demonstration of the program.
Project
The article includes a Gradle project for building the code. See the Resources section at the end of the article.
Scene Builder
Scene Builder is used to construct the UI. First select the controls.
- Create a new .fxml file in Scene Builder.
- Drag a VBox onto the canvas.
- Drag a Button onto the VBox.
- Drag a TableView onto the VBox.
Next, apply the layout to the main container of the app, the VBox.
- With the VBox selected, set the Padding to 40 on all sides and the Spacing to 10.
- Set the Pref Width and the Pref Height to USE_COMPUTED_SIZE.
- Set the Alignment to TOP_RIGHT. This pushes the Refresh Button to the TOP_RIGHT.
Adjust the layout and configuration of the TableView.
- With the TableView selected, set Vgrow to ALWAYS. This will enable the TableView to take up all the available space if the window is resized.
- Set the Pref Width and the Pref Height to USE_COMPUTED_SIZE.
- Set the Constrain Resize Policy to constrain-resize. This will allow the columns to take up the full width of the TableView.
- Remove the TableColumn C2.
- With TableColumn C1 selected, change the Text to “Screen Name”.
At this point, you can press Control+P to test your work within Scene Builder. Resize the window and verify that the TableView takes up any remaining space and that the Refresh Button retains its fixed position in the top right.
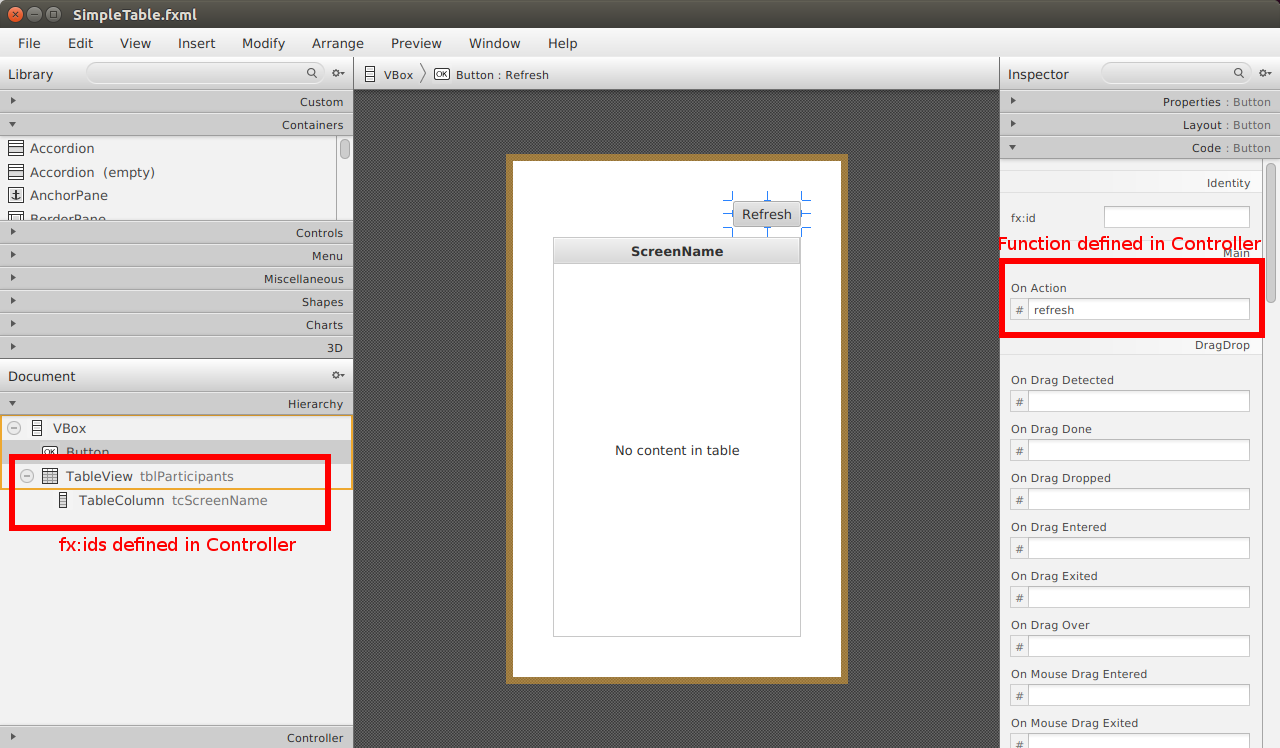
For the final step involving Scene Builder, assign the Controller, fx:ids, and function.
- In the Controller panel, set the Controller Class to net.bekwam.bkcourse.simpletableapp.SimpleTableController. This is the name of a Kotlin class that has not been created yet.
- Select the TableView and, in the Code panel, set the fx:id to tblParticipants.
- Select the TableColumn. Set the fx:id to tcScreenName.
- Select the Refresh Button. Set the On Action to refresh.
See this screenshot for the finished product. Note the annotations marking the settings from the final step.
Main and Application Subclass
This article places the Java classes in a package “net.bekwam.bkcourse.simpletableapp”.
- Create a Java file SimpleTableApp.java.
- Add a main() method and override the start() method.
- Add the code to create a screen with a Launch Button.
- Set the onAction handler to a method reference (defined later).
public class SimpleTableApp extends Application {

    @Override
    public void start(Stage primaryStage) throws Exception {

        VBox vbox = new VBox();
        vbox.setAlignment(Pos.CENTER);

        Button btnShowSimpleTable = new Button("Launch");
        btnShowSimpleTable.setOnAction( this::showSimpleTable );
        vbox.getChildren().add( btnShowSimpleTable );

        Scene scene = new Scene( vbox );

        primaryStage.setTitle("SimpleTableApp");
        primaryStage.setWidth( 480 );
        primaryStage.setHeight( 320 );
        primaryStage.setScene( scene );
        primaryStage.show();
    }

    public static void main(String[] args) {
        launch(args);
    }
The showSimpleTable() method creates a second Stage holding the UI created from the .fxml file. FXMLLoader reads in the .fxml file and creates an object graph of the UI controls including the TableView and Refresh Button. Calling load() returns the root control which is used as the argument to the Scene.
    private void showSimpleTable(ActionEvent evt) {

       try {

            FXMLLoader fxmlLoader = new FXMLLoader(this.getClass().getResource("/SimpleTable.fxml"));

            Parent p = fxmlLoader.load();

            SimpleTableController c = fxmlLoader.getController();

            Scene scene = new Scene( p );

            Stage stage = new Stage();
            stage.setTitle( "SimpleTableApp - TableView");
            stage.setWidth( 667 );
            stage.setHeight( 375 );
            stage.setScene(scene);
            stage.setOnShown( (windowEvent) -> c.refresh() );
            stage.show();
        } catch(Exception exc) {
            exc.printStackTrace();
        }
    }
}
showSimpleTable() uses a Lambda to initialize the SimpleTable screen by calling the Controller's refresh() method. A handle to the Controller is retrieved from the FXMLLoader object.
Domain Object
The TableView is backed by a domain object which is a POJO that represents data in the application. In this article, the domain object Participant is used which contains a single field “screenName”. This is the code for Participant.
public class Participant {

    private String screenName;

    public Participant() {}

    public Participant(String screenName) {
        this.screenName = screenName;
    }

    public String getScreenName() {
        return screenName;
    }

    public void setScreenName(String screenName) {
        this.screenName = screenName;
    }
}
Controller
A JavaFX Controller links the objects created from the .fxml file with the data. Add the following file SimpleTableController.java. Start with the class definition and the pair of JavaFX controls that were tagged with fx:ids in Scene Builder.
public class SimpleTableController {

    @FXML
    TableColumn<Participant, String> tcScreenName;

    @FXML
    TableView<Participant> tblParticipants;
These fields must be defined as var. It it valid syntax to use val, but this will create objects that cannot be reassigned to .fxml content later. The result would be a pair of fields disassociated from what you see on the screen.
Next, add an initialize method. While the @FXML annotation was required for the fields, the annotation is not required for functions. This is an instruction telling the TableColumn which field it will be displaying from the domain object Participant.
    @FXML
    public void initialize() {
        tcScreenName.setCellValueFactory(new PropertyValueFactory<Participant,String>("screenName"));
    }
Both the TableView and the TableColumn are defined with generics including a reference to the domain object. The TableColumn has an additional type specifier for the field. screenName is a String.
Next, add an initialize method. This is an instruction telling the TableColumn which field it will be displaying from the domain object Participant. Although the initialize() method is not mentioned in Scene Builder as was done for the refresh() method, it is still called by the framework because of the @FXML annotation.
    @FXML
    public void refresh() {

        Task<List<Participant>> task = new Task<List<Participant>>() {
            @Override
            protected List<Participant> call() throws Exception {
                return fetchData();
            }

            @Override
            protected void succeeded() {
                tblParticipants.getItems().clear();
                tblParticipants.getItems().addAll( getValue() );
            }
        };

        new Thread(task).start();
    }
Although concurrency is generally regarded as an advanced topic, it is essential to use it even at beginning levels. The refresh() button could call fetchData() directly and replace the values in tblParticipants, but this type of shortcut could blow up a deployment when larger data sets or network latency becom apparent.
Finally, add the fetchData() method that provides continuously-modified, hardcoded values to the program. fetchDAta() represents a call to the backend, say a RESTful web service call or a database call.
    private List<Participant> fetchData() {

        List<Participant> participantList = new ArrayList<>();

        participantList.add( new Participant("WALK" + counter++) );
        participantList.add( new Participant("DAVI" + counter++) );
        participantList.add( new Participant("JNYG" + counter++) );

        return participantList;
    }

    private int counter = 1;
}
This article showed how to create a simple TableView JavaFX app using the Kotlin programming language. Scene Builder was used to construct and partially test the UI. A JavaFX Controller provided the data using a Task to keep the application responsive. For more information about JavaFX and Kotlin, be sure to follow the TornadoFX project which is a framework designed to make your JavaFX / Kotlin programming even easier.
Resources
The source code presented in this video series is a Gradle project that can be imported into your IDE.
SimpleTableApp Source Zip (7Kb)
By Carl Walker
President and Principal Consultant of Bekwam, Inc