Vue.js Object v-model Use
June 28, 2020
This article demonstrates using v-model elements to modify a data field object. Two examples are presented. The first maps a single level of fields to a set of text inputs. Changing the field will change the data. The second features two levels of data.
This CodePen has an object "level1" in the data fields. level1 has three properties: fieldA, fieldB, fieldC. Initially, the default values of these fields are shown in both the text inputs and the paragraph display. Changing any of the text inputs will change the data. This is verified by the right hand paragraph display.
See the Pen Vue Object v-model Demo #1 by Carl Walker (@walkerca) on CodePen.
This screenshot shows the initial screen.
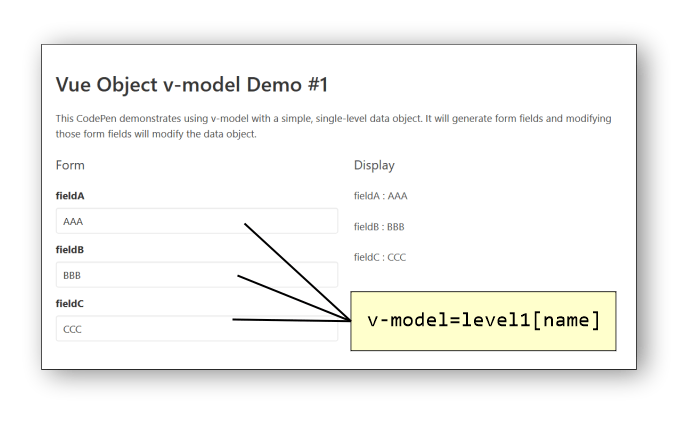
This is the data field from the CodePen. It's an object "level1" with three properties: fieldA, fieldB, fieldC
data: {
    level1: {
      fieldA: "AAA",
      fieldB: "BBB",
      fieldC: "CCC"
    }
  }
The template code uses a v-for to iterate over the properties. The loop is using the exanded syntax for the loop variable which includes value (first) and name.
  <div class="field" v-for="(value, name) in level1" :key="name">
    <div class="control">
      <label class="label">{{ name }}</label>
      <input type="text" class="input" v-model="level1[name]"/>
    </div>
  </div>
Notice the v-model expression v-model="level1[name]". From a JavaScript perspective, this is the same as working with value. However, there is special parsing in the v-model directive that will apply a Vue.set to path-like expressions. That is, if you don't use the [], you'll end up with one of the reactivity caveats. Try it! Switch the v-model expression to be v-model="value". Modifying the text field will not trigger a reactive update of the right side.
Second Example
This next CodePen is similar to the first one, but uses another loop to work with a second level of nested objects in a data field. This still is not a general solution as you need to write more and more fixed code to support deeper nesting. The general solution would involve recursion. However, if your structure is only two levels, you can use these nested v-fors.
See the Pen Vue Object v-model Demo #2 by Carl Walker (@walkerca) on CodePen.
The data is a two-level object structure.
  data: {
    level1: {
      fieldA: "AAA",
      fieldB: "BBB",
      level2: {
        field1: "One",
        field2: "Two"
      }
    }
  }
The template code for this example includes <template> HTML tags to manage the two display conditions: display a simple property or loop over an object property. The HTML template tag is a segment of non-displayable HTML used to separate the v-ifs form the v-fors (a requirement).
  <template v-for="(value, name) in level1" :key="name">
    <div class="field" v-if="typeof value != 'object'">
      <div class="control">
        <label class="label">{{ name }}</label>
        <input type="text" class="input" v-model="level1[name]"/>
      </div>
    </div>
    <template v-else>
      <div class="field ml-4" v-for="(value2, name2) in value" :key="name2">
        <div class="control">
          <label class="label">{{ name2 }}</label>
          <input type="text" class="input" v-model="level1[name][name2]"/>
        </div>
      </div>
    </template>
  </template>
As before, the v-model expressions include a path-like syntax which will trigger Vue.set calls. See level1[name1][name2].
When working with v-model, I often keep the end in mine. I determine the syntax of the expression that will wind up in a textfield first, then work with the v-if and v-for attributes to implement. The goal is to get the correct path so that not only will Vue map your input to data fields correctly, but will also slip in a reactive Vue.set. If you're looking for guidance on working with v-model and arrays, see this article.

By Carl Walker
President and Principal Consultant of Bekwam, Inc